Help and Documentation
Overview
The Staff Leave Planner is a tool written in Microsoft Excel to allow you to record and manage the leave of your employees.
The planner typically contains a set 12 month period which should align to your annual leave reporting year.
Some of the main features and customisations you can make to the planner include:
- Adding and amending codes on the planner
- Setting up protection to give other team members a read only version of the planner
- Setting up leave accrual
- Tracking leave in days or hours
- Adding national holiday and other significant dates
- Adding your own columns to the employee data sheet
- Use your own formulas to calculate leave entitlement
- Generating reports for either individuals or teams
- Import data from a previous planner
| Worksheet Name | Description |
|---|---|
| Employee Data | The employee data sheet is where you enter your employee details and their entitlement.
The settings on this sheet allow you to:
|
| Calendar Worksheets | The calendar worksheets serve two main purposes:
|
| Individual Reports | Individual reports allow you to see a full breakdown of an employees' leave across specific dates and specific leave codes. These reports can be exported to pdf or excel workbooks, and the export can be run as an automatic batch job for multiple employees. |
| Group Reports | Group reports allow you to see summarised totals of groups of employees across specific dates and specific leave codes. These reports can be exported to pdf or excel workbooks. |
| Monthly Reports | Monthly reports allow you to reproduce the views from the calendar across a more specific group of employees, leave codes or time frames. These reports can be exported to pdf or excel workbooks. |
| Main Menu | The main menu allows you to quickly navigate to parts of the planner as well as assign the following global settings:
|
Quick Start Guide
Run the initial setup
First of all, open the planner and enable macros:
- Run the setup wizard by clicking on the red "Click here to setup the planner" button.
Add employees and their leave information
The next task is to add some employees and entitlement details:
- Open the "Employee Data" worksheet
- Type in the employee names and add their leave entitlement amounts
Record some leave details
Then navigate to the calendar sheet to start adding leave information:
- Open one of the calendar worksheets e.g. "Jan-Jun"
- Click on the cell you need to add the leave to.
- Right click the cell and select the leave code from the popup menu, or simply type in the leave code. Note: if you are tracking leave in hours we recommend using the right-click method.
Look at customising the planner
Take a look at some of the ways the planner can be customised:
Installation
Step 1 - Save the Planner to your computer
When you purchase and download the planner it will be contained in a zip file. You must extract the planner from the zip file before using it otherwise you will not be able to save it. If you are unsure of how to unzip the planner, typically right click the file and choose "extract all". The planner can then be found in the sub folders that were extracted.
The planner can be saved to a network drive or a shared folder so that other users can access it.
Step 2 - Open the Planner and enable Macros
Double click the file to open it in Excel. You will likely see some security prompts at the top of the document warning you about macro content. This is ok, the planner uses macros to performs it's calculations and provide you with additional features. You will need to enable macros for the planner. For further details on enabling Macros please see the following Microsoft help page: Enable or disable macros in Office files
Step 3 - Run the setup wizard
The setup wizard will guide you through configuring the planner for your first time use. Any settings you choose here can be configured at a later point in time. To run the wizard click on the red "Click here to setup the planner" button.
Importing from Another Planner
If you have previously used the planner you can choose an option during setup to import your data from a previous planner. The importer will allow you to transfer important information from one planner to another such as:
- Employee names
- Employee entitlement amounts
- All other data on the Employee data sheet
- Category and Keycode settings
- You should review the leave entitlement amounts for your employees as the planner will not calculate any carried over leave.
- The import is a copy of the data from your current planner. Therefore any subsequent changes made to the data in the current planner will not be reflected in the new planner once the import has been made.
You can only import data from anotehr planner during the initial setup of the planner. To import data follow the steps below:
- Click on the red "Click here to setup the planner" button.
- On the form that appears choose the option to "Import data from another planner"
- Click the "Next" button
- an "Open File" window will appear - use this to browse to your planner. There will be a short delay whilst the planner reads the data. Note: the planner will only let you import from .xls and .xlsb formats.
- Click on the next button and complete the form.
The Employee Data Sheet
The main purpose of the employee data sheet is to provide a place where you can add, edit and delete employee information. All of your employee information needs to be edited from this worksheet (and not the calendars). The changes that you make here will be cascaded to other sheets. The columns that show you leave entitlement, taken and remaining are linked to how you have configured your leave categories and keys, specifically:
- If a category has been setup "to track leave with an entitlement" then you will see the entitlement and leave remaining columns on this worksheet.
- If a category has been setup "to track leave taken only" then you will see the amount of leave taken only.
The main functionality of the Employee Data worksheet is as follows:
- To add and delete employees from the planner.
- To add or edit entitlement amounts.
- To allow you to sort the data e.g. by name, department, leave taken etc.
- To show totals for leave taken and leave remaining.
- To define whether employees track leave in days or hours.
- To allow you to insert custom columns that add or subtract to leave entitlement.
- To allow you to rename columns.
Adding employees to the planner
- Click on the orange "Add employee" button. The planner will select the next avaialble cell for you.
- Enter the employee first name and last name.
- Determine whether they need to track leave in days or hours. Note: it is not possible to track some of an employee's leave codes in days and some in hours. Leave has to either be all recorded in days or all recorded in hours.
- Add their leave entitlement to the leave entitlement columns.Note: columns shaded in blue are protected by the planner and automatically show either total leave entitlement, leave taken or leave remaining. To edit how much leave an employee has, ensure that you edit the "leave entitlement" column.
Viewing and editing leave amounts
Leave categories can be setup to simply count the amount of leave taken or they can be setup to have an entitlement. When leave is setup to have an entitlement you will typically see the following columns (in this example let's assume the leave category is called "maternity leave"):
- "Maternity Leave - Entitlement" - use this column to enter how much entitlement they have to this leave. To set the amount of leave simply click on the cell and type the leave amount into it, e.g. "25"
- "Maternity Leave - Taken" - this column shows how much of this leave has been taken. It is automatically calculated by the planner and is protected so that you cannot overwrite the formula in it.
- "Maternity Leave - Remaining" - this column shows how much of this leave is remaining. It is automatically calculated by the planner and is protected so that you cannot overwrite the formula in it.
When you change the leave amounts the planner will also update any leave amounts that are shown on the calendar sheet.
Deleting employees from the planner
- Click on the orange "Delete employees" button. A form will appear.
- Use the search to find the employee(s) to delete and click on the "Add" button to add them to the list.
- Once you've added all of the employees to the list click on the Apply button. The employee(s) will be removed from the planner.
Sorting Employees
You can sort the data on the employee data sheet by using different criteria. You can also optionally apply this sort to the calendar worksheets.
- Click on the orange "Sort employees" button. A form will appear.
- Use the dropdown menus to select the criteria to sort the employees by.
- Click on the Apply button. The employee(s) on the employee data sheet will be sorted.
- You will be asked if you wish to apply the same sort to the calendar worksheets, choose yes or no as appropriate.
Extending the number of Employees
If you run out of rows to add employees to the planner then the planner can be extended to the next size up. This may incur costs in terms of users and administration fees, please contact support for more information.
Renaming columns
It's possible to rename the columns on the Employee Data sheet:
- Click on the orange "Employee Data Settings" button.
- Select the column you wish to rename in the list.
- Click on the "Rename Column" button and enter the new name.
- Click on the "Apply" button to apply the changes
Deleting Columns
Columns that are not a Built In type can be deleted from the planner. Built-in columns can be hidden. To make these changes:
- Click on the orange "Employee Data Settings" button.
- Select the column you wish to delete/hide.
- Click on the "Delete Column" / "Hide Column" button.
- Click on the "Apply" button to apply the changes
Changing the column order
It's possible to change the order in which columns are shown on the Employee Data sheet:
- Click on the orange "Employee Data Settings" button.
- Select the column you wish to move in the list.
- Use the arrow buttons on the right hand side to move the columns up or down in the order (up = column will move left, down = column will move right).
- Click on the "Apply" button to apply the changes
Adding extra columns to the worksheet
You can extra columns to the planner which can be:
- Standalone free text columns.
- Linked to a category, adding or subtracting from the leave amount.
Adding columns to the planner is all achieved via the employee data settings. In this example we will add a column that is linked to annual leave, and when data is entered into the column it will update the total entitlement:
- Click on the orange "Employee Data Settings" button.
- Click on the "Add Column" button
- Select the following options:
- "What type of column do you want to create?" > A column linked to the total leave calculated for a category.
- "Select the Category to link it to:" > Annual Leave
- "Should this column add or subtract against the total leave entitlement?" > This column should add to the total leave calculated
- "Enter the title for this column" > Additional Annual Leave
- "Choose the formatting for this column:" > Text/Number
- Click on "Ok" to close the dialog.
- Click on the "Apply" button to apply the changes
The Calendar Worksheets
The main purpose of the Calendar worksheets are to provide you with a place to record when employees are taking leave. Your leave year will be split over 2 worksheets with 6 months typically shown on each sheet. It is possible to setup a read only view of the calendar so that employees who are not administrators can view the leave booked. For more information please see the [password and security] section.
The calendar sheet has the following functionality:
- Record / view when employees are taking leave.
- Add comments to leave entries.
- See additional detail about leave e.g. amount taken and remaining, for up to 5 columns.
- Sort the data e.g. by name, department, etc.
- Export the calendar to another workbook so that it can be shared.
- Configure which days of the week to show, border or shade.
- Configure which national holidays and other significant dates to show.
Recording leave onto the calendars
Entering leave
Leave can be recorded onto the planner by selecting the leave code from the right-click menu or by typing in the leave code (followed by the number of hours if tracking in hours). It is also possible to enter multiple leave codes into a single day.
To enter leave via the right-click menu:
- Locate the cell that aligns with the employee name and the leave date.
- Right click the cell and choose "Add Leave Code" from the menu.
- Keep selecting through the menu until you find the correct leave code.
- If an employee is tracking leave in hours you will then be asked for the amount of hours to log against this leave code
To enter leave directly into the cell:
- Locate the cell that aligns with the employee name and the leave date.
- Enter the leave code e.g. "S", if an employee is tracking leave in hours you will also need to enter the hours e.g. "S7.5" for 7.5 hours
Entering multiple codes onto the same day
To enter multiple leave codes into the same day we recommend using the right-click menu method outlined above. Simply repeat this for each code you need to enter into the same day.
Entering the same leave code against multiple days
To enter the same leave code across multiple days:
- Hold the left mouse button down on the first cell and then move the mouse until all the relevant cells are highlighted.
- Release the left mouse button.
- Click the right mouse button.
- Choose "Add Leave Code" from the menu.
- Keep selecting through the menu until you find the correct leave code.
Deleting leave entries
To delete leave codes that have been entered:
- Locate the cell containing the leave code.
- Right click the cell and choose "Delete Leave Code(s)" from the menu.
Adding comments to leave entries
You can add comments to leave entries which will then appear on the reports that are generated.
To add or edit comments on a leave entry:
- Locate the cell that you want to add or edit the comment.
- Right click the cell and choose "Add / Edit Leave Comments" from the menu.
- The "Comments" form will appear:
- Add the comment into the 'Comment' box, or edit it if required.
- Use the checkbox beneath it to make the comment visible if required. This means that the comment will always show above the cell, otherwise the comment will show when you hover the mouse over the cell.
- Click on the "Add / Update Comment" button.
Deleting comments from leave entries
To delete an existing comment:
- Locate the cell that has the comment.
- Right click the cell and choose "Clear comment" from the menu.
Customising how weekdays and weekends are shown
You can customise how the days of the week are shown via three different options:
- "Show" the day - if not checked the day will be hidden.
- "Shade" the day - if checked the day will be shaded in grey. Any leave codes entered onto the day will overwrite the shading.
- "Border" the day - if checked a black border will line down the left hand side. This is useful to indicate where the week starts.
To make these customisations:
- Click on the orange "Calendar Settings" button.
- Check / uncheck the options shown for each weekday.
- Click apply.
Editing national holidays and other significant dates
You can add pre-existing or your own national holidays / significant dates to the calendar:
- Click on the "Significant dates (e.g. national holidays) tab".
- To add a new national holiday date:
- Click on the "Add New Date" button.
- Complete the form
- Make your changes and click the "Apply" button when you're finished.
- To edit an existing date:
- Click on the date in the list to select it.
- Click on the "Edit Date" button
- Make your changes and click the "Apply" button when you're finished.
- To delete a date:
- Click on the date in the list to select it.
- Click on the "Delete Selected" button
- Click the "Apply" button when you're finished.
Customising the columns shown
The calendar sheets allow you to show up to 5 columns of data relating to leave which appear next to the names of your employees. The default settings are to show the amount of annual leave taken and the amount of annual leave reamining. If you need to see more leave details than the 5 columns allow we suggest looking at the data stored on the employee data sheet or look at running a group report which will give you this information in greater depth. To customise the columns shown:
- Click on the orange "Calendar Settings" button.
- Use the dropdowns to select the category you want to show leave information for.
- Then choose the information to show (e.g. total taken, amount remaining, amount accrued etc). Please note the options shown here will depend on how whether the category has been setup to simply track leave or have an entitlement.
- You can then give the column a name, although a default will be generated
- Click on the "Apply" button to save your changes and apply them to the calendar.
Categories and Keys
The planner operates on the principle that there are leave categories and leave keys. A Leave category is the overall category for the type of leave you are tracking, such as "Annual Leave", "Sick Leave", or "Maternity Leave". Leave keys are the individual keycodes that are associated with the category, e.g "S" for a day of sickness, "SH" for half a day of sickness etc.
Each leave category can be set up in one of two ways:
To "track leave as entitlement" which means:
- You will be able to allocate an entitlement to this leave, see the amount taken and see the amount remanining.
- Columns for entering and seeing this data will be available on the Employee Data sheet
To "track leave taken only" which means:
- The planner will only show you the total amount of leave taken, you will not be able to assign an entitlement to it.
- A column showing the leave taken will be available on the Employee Data sheet
Before adding a code to the planner consider the following table:
| What do you wish to achieve | Which process should you follow. |
|---|---|
| I want to add a code for a category that does not already exist |
|
| I want to add a code to an existing category, the code should remove 1 day from the total leave taken |
|
| I want to add a code to an existing category, the code should remove half a day from the total leave taken |
|
| I want to add a code to an existing category, I'm tracking leave in hours |
|
| I want to add a code to an existing category, the code should accrue leave and increase the total leave entitlement. |
|
Add a Category to the Planner
The name that you give the leave category will be the name that it is referred to throughout the planner. Therefore we recommend keeping it short and descriptive. For example, if you call the category "Unpaid Leave" then this is the name that will be used to create the column titles on the Employee Data sheet and it will be the name used to refer to the category when creating reports.
To add a new category follow the steps below:
- Navigate to the "Keys" worksheet.
- Click on the orange "Click here to customise the keys" button.
- Click on the "Create Category" button and fill in the form as follows:
- Count should be used when you only want to know the total amount of times this category is logged on the calendar.
- Entitlement should be chosen if you wish to allocate a specific amount of leave.
- Choosing entitlement will create appropriate columns on the Employee Data sheet where you can enter the entitlement amounts.
- Once you've created the category you will want to add key codes to it (see section below).
- Once you've added all of your categories click on the "Apply" button.
| Control | Description |
|---|---|
| Category name | The overall name of the category, e.g. "Annual Leave". |
| Default Colour Code | Click to change the default colour that keycodes will use for this category. Please note that when you add keycodes it is possible to use different colours to this one. |
| How do you want to track leave | Choose either Count or Entitlement:
|
| Enable Leave Accrual (Time off in lieu) | If the leave for this category is to be tracked as entitlement then this option becomes enabled. Checking this option will place a column on the employee data sheet to show you TOIL accrued, and it will also enable options on the key codes to let you create TOIL keys. |
Add a Keycode to the Planner
You can add multiple keycodes to a category. The default behaviour of a keycode is that when a key is logged onto the calendar it will increase the leave amount taken and reduce the overall amount of leave remaining. However it is also possible to setup a leave code that will just increase the amount of entitlement i.e accrue leave. There is a slightly different process to follow for this which is listed below [link].
To add a key follow the steps below:
- Navigate to the "Keys" worksheet.
- Click on the orange "Click here to customise the keys" button.
- The top area of the form lists all of the categories. Click on the category that you wish to add the leave to.
-
The "Add Key Codes" form will appear, complete it as follows:
Control Description Title Choose the title to describe the leave code. - If you track leave in days it might be best to indicate the day length in the title so that it's clearer later on e.g. "Unpaid Leave Full Day" or "Unpaid Leave Half Day".
- If you track leave in hours then the title does not have to be as descriptive, e.g. "Unpaid Leave".
Colour This is the colour that the calendar cell which change to when you enter the code. Click on it to change the colour. Code Choose the code that you will enter on the calendar. If the leave is for a full day or will be used for tracking in hours we recommend using just one letter e.g. "U". If it's a half day it's worth putting an extra letter on the end to distinguish this, e.g. "Uh". Weighting Weighting applies to the keycode when you enter it onto the calendar for an employee who is tracking leave in days. If you are tracking leave in hours then this is ignored as you have to supply the weighting (hours) when entering the code e.g. "U7.5". - For a full day set this to "1".
- For a half day set this to "0.5".
- For a quarter of a day set this to "0.25".
- Once you've completed the form click "Ok".
- If you wish to add more keycode repeat the above steps.
- When you are ready click on the Apply button.
Add an Accrual / TOIL (Time off in Lieu) Key Code
You can setup an Accrual code providing that the category for the keycode is set to track leave as entitlement, and that TOIL is enabled on the category. To check that the category has been setup correctly:
- Navigate to the "Keys" worksheet.
- Click on the orange "Click here to customise the keys" button.
- The top area of the form lists all of the categories. Click on the category that you wish to add the TOIL key to.
- Click on the "Edit Category" button.
- Set the following options:
- How do you want to track leave for this category? Is set to "Staff have an entitlement to this leave"
- Enable Leave Accrual (TOIL) on this category is ticked.
- Now that the category has been setup correctly, follow the process above to add the keycode to the planner and ensure that you have the option "This keycode accrues leave (TOIL)".
Individual Reports
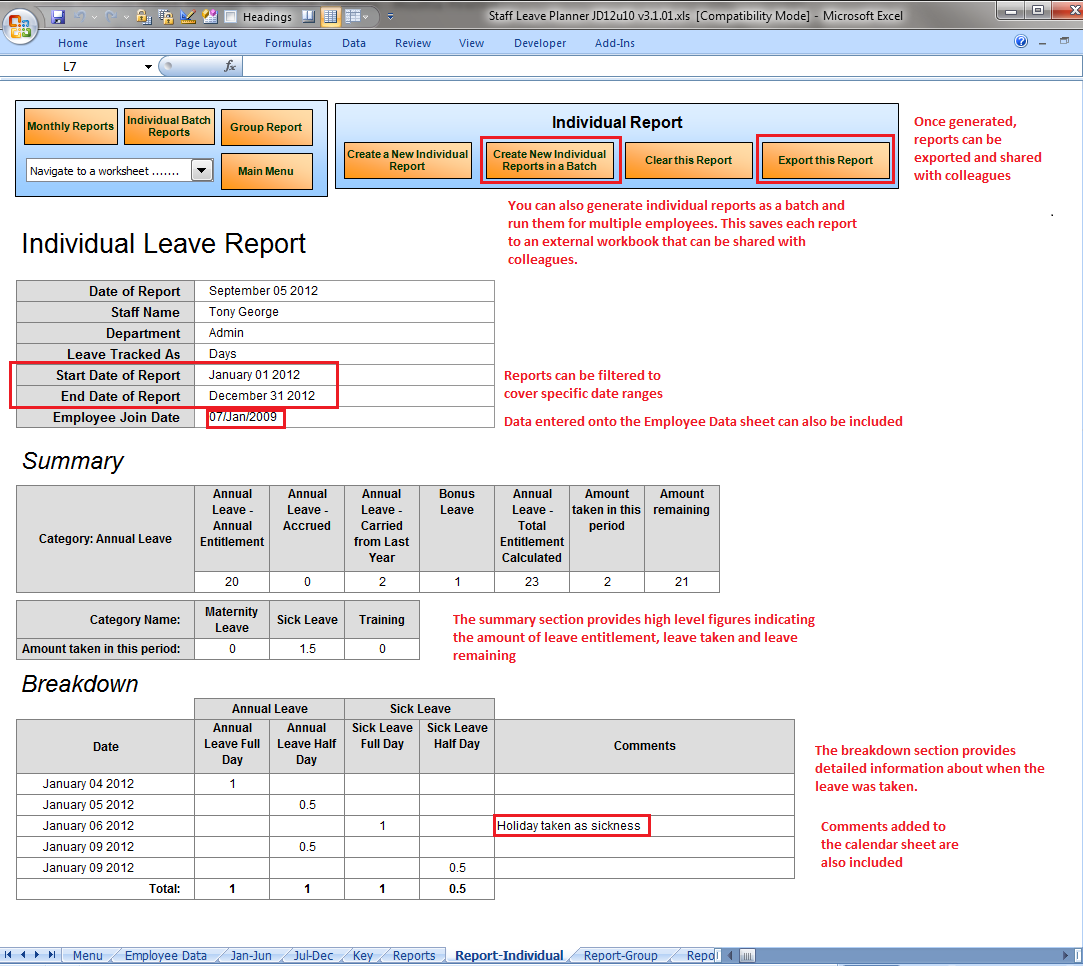
The Staff Leave Planner allows you to generate reports for individual employees. This report contains detailed information about the type of leave the employee has taken.
With an individual report you can:
- Generate a full leave report across the entire calendar year.
- Generate a partial leave report across specific dates.
- Generate a report for all leave categories or only specific leave categories.
- See any comments included on the calendar sheet on the report.
- Include additional information that you have added on the Employee Data worksheet.
An example of an individual report is shown below:
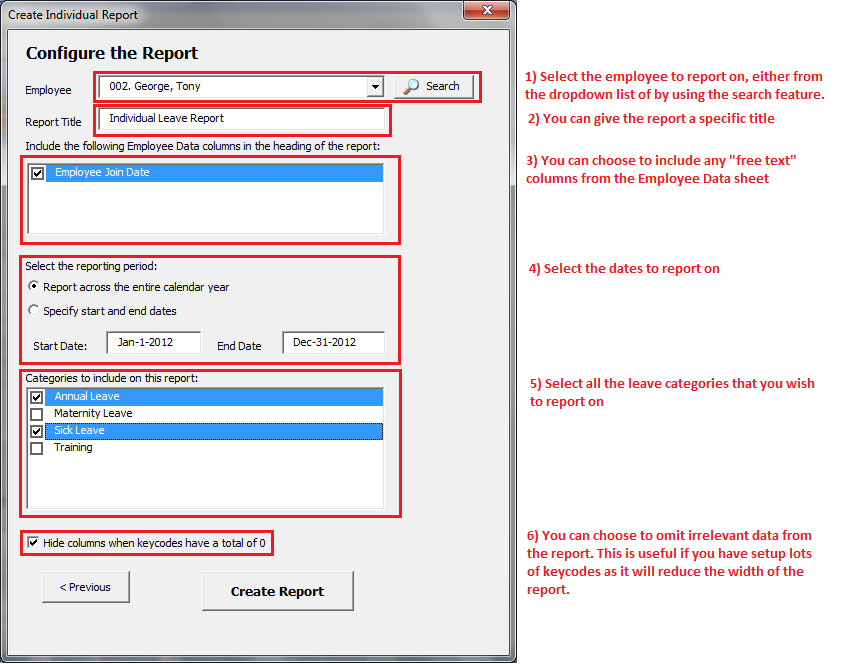
Generating Individual Reports
- Login to the planner, click on the "Reports" button and then click on the "Individual Report" button.
- Choose whether to create a report using the settings from last time, a brand new report or to load a saved report. Once you have chosen, the main report settings form will appear.
- Once you have chosen your options, click on the "Create Report" button and the report will be generated.
Exporting Individual Reports
The report can be exported to a seperate workbook, which is ideal for sharing with your colleagues. To use this feature follow the steps below:
- Click on the orange "Export This Report" button
- Choose whether or not to password protected the exported sheet
- Click on the "Export" button.
- Choose where to save the report to and click "Save".
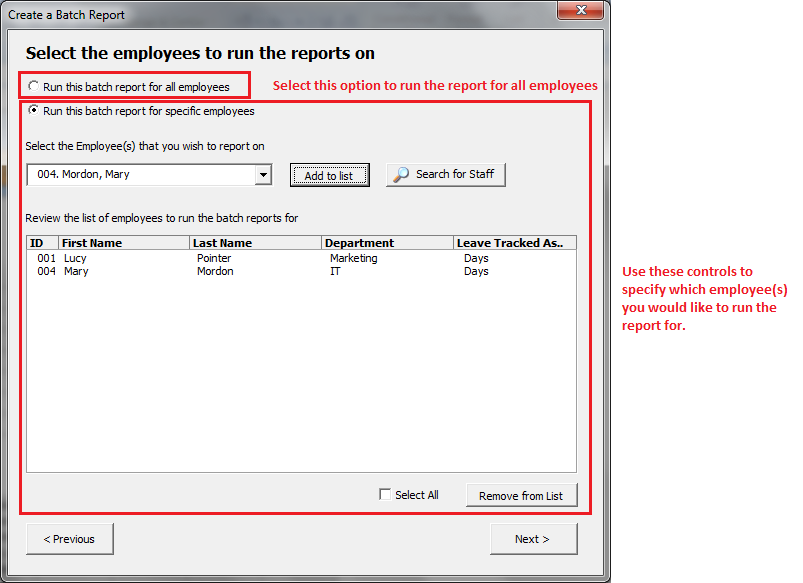
Running Individual Reports in a Batch
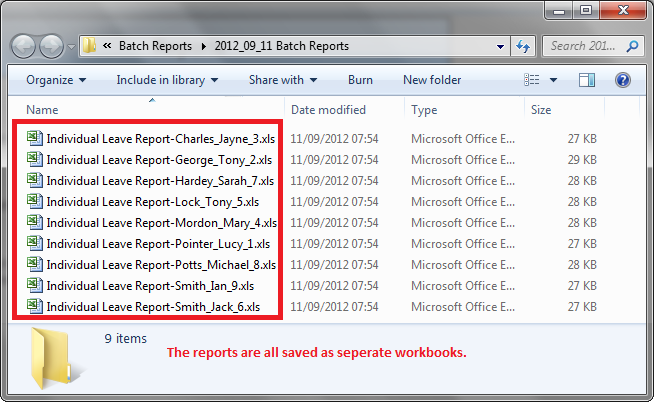
You can use the "Batch Leave Reports" feature to automatically generate and save a series of Individual Leave Reports, which will be saved as seperate Excel files on your computer.
These files could be kept for record keeping or sharing with employees and can be password protected to prevent editing.
To generate the reports as a batch:
- Login to the planner, click on the "Reports" button and then click on the "Individual Batch Report" button..
- You can use the following screen to select the employees that you wish to include in the batch report:
- Once you have chosen the employees to run this report for, click on the "Next" button.
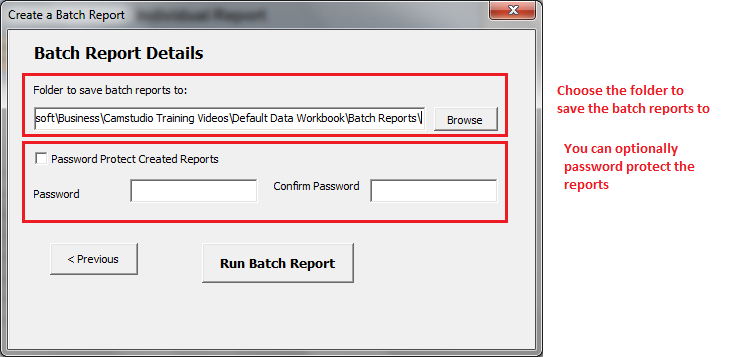
- Choose your options as you would for a normal Individual Report.
- The final options page is shown, which allows you to pick the directory to save the files to and also apply a password to the files.
- Click on the "Run Batch Report" button. The planner will then save the reports as individual spreadsheets to your chosen directory.